
AndyCAD User Guide
AndyCAD is a 2D drawing and drafting app for Windows, with AndyAI, an assistant that draws for you. This guide walks through the screen, the drawing and editing tools, text, colour and textures, dimensions and connectors, and how to get drawings in and out of AndyCAD. New to AndyCAD? Start with the step-by-step tutorials.
Getting started
- Download AndyCAD and run the installer.
- Open AndyCAD and sign in with your AndyCAD account when it asks. Your browser opens this site; sign in and click Allow.
- A new drawing opens on a page (A4 portrait). Pick a tool on the left or on the Draw tab and start drawing.
Can't find a command? Press Ctrl+K and type its name.
The screen
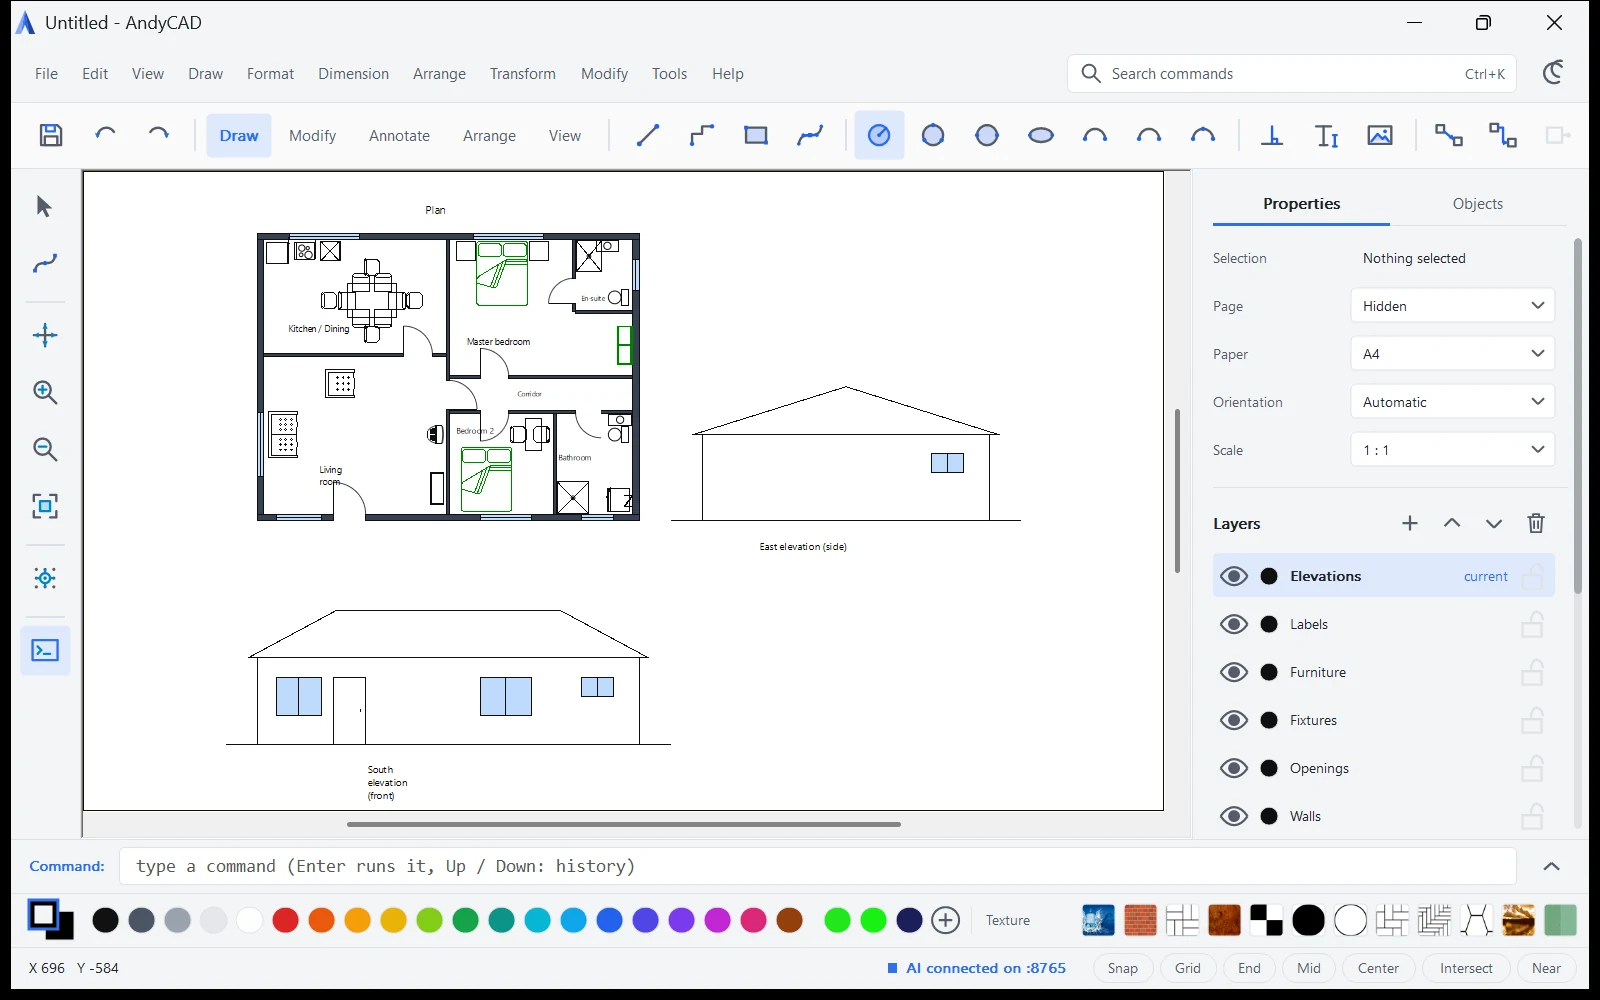
- Tabs along the top group the tools: Draw, Modify, Annotate, Arrange and View. Each tab's icons have their own colour (Draw blue, Modify orange, Annotate teal, Arrange purple, View sky blue), so you can tell at a glance where a tool lives. The menus (File, Edit, View, Draw, Format, Transform, Modify, Tools, Help) hold every command.
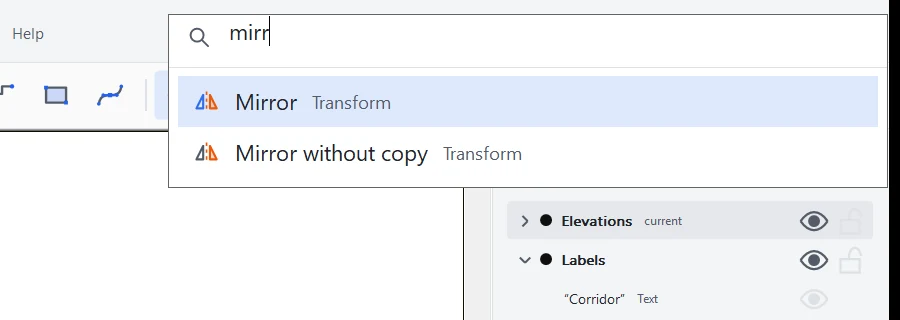
- Search commands (Ctrl+K): click the Search commands box on the tab bar or press Ctrl+K, type part of a command's name ("mirror", "fillet", "layer") and the matching commands drop down under the box, as in Microsoft Office. Press Enter to run the highlighted one, Esc to close.
- Tool rail on the left: Select, Edit nodes, Pan and the most used drawing tools.
- Side panel on the right, with two tabs:
- Properties: what is selected (see Selecting and editing), or the page when nothing is selected. Below it are Layers and the Library.
- Objects: every object in the drawing, layer by layer (see The Objects tab).
- Toolbar above the selection: a small floating card with the common actions for what you have selected.
- Status bar: the cursor position, the length, angle and area of what you are drawing, and the snap toggles (Snap, Grid, End, Mid, Center, Intersect, Near).
- Light or dark theme: View > Dark Theme, or the theme button on the tab bar.
While you draw, a small label next to the cursor shows the current size, length and angle.
The page
New drawings show the page you will print or export: a white sheet on a grey desk, with its margins dotted and its name above it (for example "A4 portrait 1:1").
- With nothing selected, Properties shows Page (shown or hidden), Paper, Orientation and Scale. View > Page also turns the page on and off.
- Paper offers presets in groups:
- Paper: A0 to A6, Letter, Legal, Tabloid.
- Print: flyers (A5, A6, DL, Letter), posters, business cards, postcards, a trifold and a roll-up banner.
- Social media: Instagram post, portrait and story, Facebook, X, LinkedIn, YouTube and Pinterest, at their exact pixel sizes.
- Screen: HD and slides.
- Social media and screen pages have no margins.
- When the page is shown, Print, PDF and PNG/JPEG export exactly what is inside its margins, at its size and scale. Zoom to fit frames the page.
Files
- File > New / Open / Save / Save As. AndyCAD drawings are
.afffiles. Save As also writes DXF, PNG, JPEG, SVG and PDF (see Import and export). - File > Import adds the contents of another file to the current drawing: AndyCAD (
.aff), DXF, SVG and BMP images. - Recent files are at the bottom of the File menu.
- Print: File > Page Setup, Print Preview and Print. Large drawings can print across several pages, and you can print in colour, greyscale or black lines.
- Autosave: AndyCAD saves a copy of your drawing every few minutes to
%LOCALAPPDATA%\AndyCAD\temp000.aff. If AndyCAD closes unexpectedly, open that file and save it under a new name.
Drawing
All drawing tools are on the Draw tab and the Draw menu. Click a tool, then click points on the drawing. Press Esc to stop. Right-click while drawing for the tool's options.
| Tool | How to draw it |
|---|---|
| Line / polyline | click each point; Esc or right-click to finish |
| Orthogonal line | like a line, but each segment is horizontal or vertical |
| Perpendicular line | a line at right angles to an existing one |
| Multiline | several parallel lines at once (walls) |
| Rectangle | two opposite corners |
| Circle | centre, then radius; also from 2 points (a diameter) or 3 points on the circle |
| Ellipse | the bounding corners |
| Arc | from the centre, from 2 points, from 3 points, or start-end-centre; the closed arc is a pie slice |
| Spline | see Curves and splines |
| Text | see Text |
| Image | pick a picture file, then drag its box |
Selecting and editing
- Select (arrow): click an object, Shift+click to add more, or drag a box around several. Objects highlight as you hover over them. Drag a selected object to move it, or drag its handles to resize it. Ctrl+A selects everything.
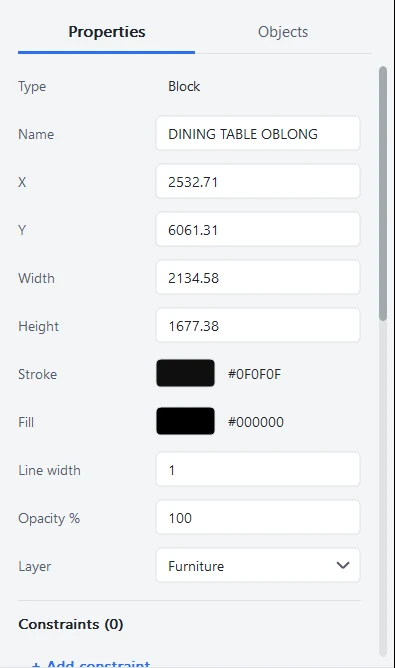
- Properties shows the selection's type, name, position, width and height, stroke and fill colour, line width, Opacity %, line ends and layer. Edit a value and press Enter.
- Arrow keys nudge the selection. With nothing selected they pan the view.
- Undo / Redo: Ctrl+Z and Ctrl+Y. A big move, rotate or scale is one Undo step. Cut, Copy, Paste, Delete work as usual.
- Group / Ungroup (Arrange tab) join objects into one and split them again.
- Order: Bring to front, Bring forward, Send backward, Send to back, or drag rows in the Objects tab.
The Modify tab and the Transform and Modify menus hold the editing tools:
| Tool | What it does |
|---|---|
| Move, Slide | move the selection by a base point and a target; Slide keeps it on a line you pick |
| Rotate | turn around a picked centre |
| Scale | resize around a picked point |
| Flip horizontal / vertical | flip in place |
| Mirror copy / Mirror | mirror across a line you draw, with or without keeping the original |
| Copy, Parallel copy | a copy, or a copy offset at a set distance (circles and arcs give concentric copies) |
| Polar copy, Angular array | copies around a centre |
| Rectangular array | rows and columns of copies |
| Fillet, Chamfer | round or bevel the corner between two lines |
| Trim, Extend | cut a line or curve where other objects cross it, or extend a line to meet one |
| Add node, Delete node | add or remove a point on a line or curve |
| Break curve, Close curve | split a line or curve, or close it into a loop |
The Objects tab
The Objects tab of the side panel lists everything in the drawing, like an object manager:
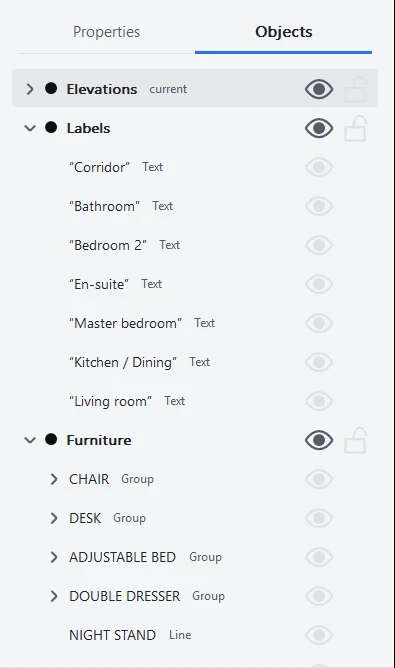
- Each layer is a folder, with its colour, eye and lock. Click a layer to make it current; its arrow opens or closes it.
- Its objects are listed from the top of the stack down, by name (or by type, and texts by their first words). Groups open like folders onto their parts.
- Click a row to select that object; Ctrl+click adds it to or removes it from the selection. Double-click to rename it (Enter keeps the name, Esc cancels).
- Each object row has its own eye (hide it: it is not drawn, printed or exported) and lock (it is drawn but can't be selected). Both can be undone and are saved in the file.
- Drag a row up or down to change the stacking order within its layer. A blue line shows where it lands.
Curves and splines
- The Spline tool draws a smooth curve through or near the points you click. Esc, Enter or a double-click finishes it.
- Edit nodes (on the tool rail) shows a curve's points and handles: drag them to reshape it. Add node and Delete node add and remove points; Break curve and Close curve open and close it.
- Closed curves can be filled and used in shape operations.
- Splines imported from DXF and SVG keep their shape.
Text
- With the Text tool, click to place a text box and start typing, or drag to make a frame of the size you want. New text is 24 pt Segoe UI.
- Click outside the text to keep what you typed. Esc cancels the edit.
- With a text selected, Properties has Font, Size (8 to 144 pt), Style (bold, italic, underline) and Align. While you are typing, they apply to the selected letters.
- The frame grows downwards when the text needs more room.
- Format > Text Characters Scale With Box: when on, resizing the box scales the letters; when off, the text wraps inside the box.
- Format > Convert Text to Curves turns text into outlines that can be filled, edited and used in shape operations.
Colour, textures and transparency
- The colour band sets the stroke (outline) or fill colour of the selection, or of what you draw next. Right-click a chip for more: colour the other part, change that chip's colour, or reset the colours. Your last picked colours follow as extra chips.
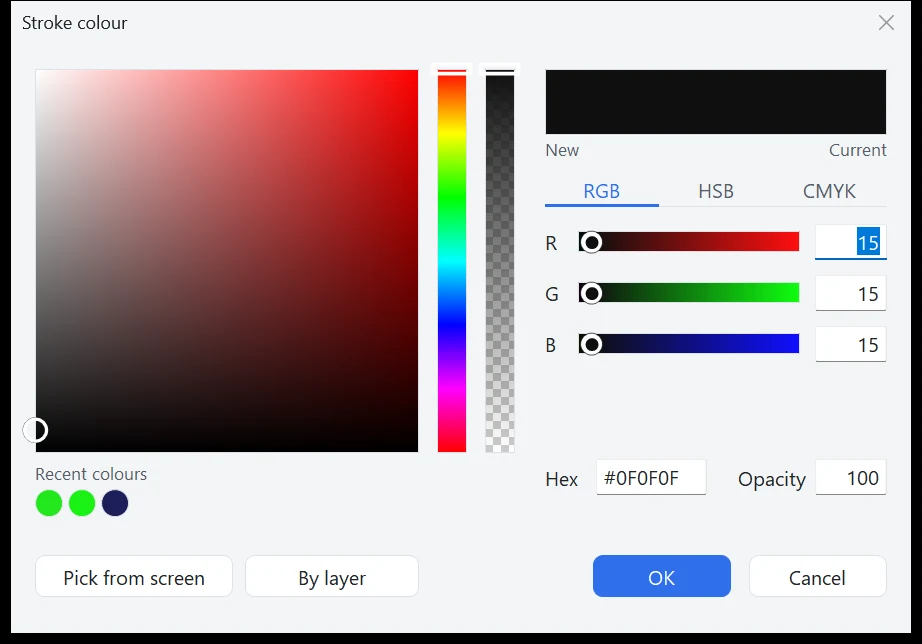
- The colour picker opens wherever you choose a colour: a shade square and hue strip, opacity, RGB, HSB and CMYK sliders, a hex box, an eyedropper (Pick from screen), your recent colours and By layer.
- Line style (Format > Line Style): solid, dot, dash, dash-dot, dash-dot-dot. Line width (Format > Line Width): normal, thin, thick or a custom width.
- Line ends: the Start and End rows in Properties put an arrow, open arrow, dot, circle, square or diamond on the ends of a line. They print and export too.
- Fill (Arrange tab, or Modify > Flood Fill) fills a closed shape.
- Textures fill a shape with a pattern: hatches, brick and tile, lawn, trees, parking bays and more. A texture tiles (repeats) by default; untick Tile (Repeat) in Format > Texture to stretch it once. Format > Texture also sets how it mixes with the fill colour: Replace, Decal (tinted with the fill colour), Multiply or Fill colour only.
- Your own textures: Format > Texture > Add Texture from File... (also first in the texture bar's "..." menu). Pick a PNG, JPEG, BMP, GIF or TIFF image. AndyCAD shrinks it to at most 512 pixels, keeps it in
%APPDATA%\AndyCAD\texture, lists it first on the texture bar and applies it to the selection. - Transparency: the Opacity % row in Properties makes a whole object see-through. Format > Transparency sets the fill and outline transparency, and the transparency menu adds fades: linear, radial, along the outline, or along a curve you draw. Remove transparency fade takes it off.
Shapes: clip and boolean operations
Select two or more closed shapes, then use Modify > Shape:
| Command | Result |
|---|---|
| Union | one shape covering all of them |
| Difference | the first shape with the others cut out |
| Intersection | only the area they share |
| Exclude | the areas covered by exactly one shape (no overlaps) |
- Fill Rule Even-Odd / Non-Zero chooses how overlapping loops inside one shape are filled (even-odd leaves holes).
- Reverse Direction flips a shape's direction, which matters for the non-zero rule.
- Clip shape (Modify tab) cuts one shape with another.
Dimensions
The Dimension menu and the Annotate tab:
- Horizontal, Vertical and Free dimensions: press the mouse button on the first point, drag to the second and let go. Turn on End snap first so the ends land exactly on corners.
- Outer arrows variants put the arrows outside the extension lines, for short distances.
- Angular, Radius and Diameter dimensions, and Leader for a note with an arrow.
- Dimensions are associative: move or resize the shape and the dimension follows.
- Edit dimension value: type a new value and the measured shape changes to match.
Connectors
Connectors are lines that stay attached to shapes, for diagrams and schematics.
- Straight connector and Elbow connector (Draw tab, or Modify > Connector): click on the first shape, then on the second. A dashed preview follows the cursor after the first click.
- Click on a shape's port (pin) to pin the end there, or anywhere else on the shape to make a floating end that slides round the outline to face the other end.
- Move a shape and its connectors follow, live while you drag. Elbow connectors leave the side they are attached to and turn at right angles round the shapes.
- Select a connector to drag its ends: onto a port, onto a shape, or into empty space.
- Add pin adds a connection point to a shape. The Start and End rows set the line ends (arrow, dot and so on).
Constraints
Constraints keep geometry in a given relation while you edit: Parallel, Perpendicular, Horizontal, Vertical, Colinear, Equal length, Angle, Distance and Coincident points (Arrange tab, or Modify > Constraint Segments).
Select an object and its constraints are listed in Properties:
- Each row shows the kind of constraint, the other object it ties to, which ends or edges, and which object moves.
- Distance rows have a value box: type a length and press Enter. Angle rows have a drop-down (0, 30, 45, 60, 90 and more). The drawing changes at once.
- + Add constraint lists the constraint commands; a hint tells you what to click next. Esc cancels.
- The bin deletes a constraint. Hover over a row to light up the other object on the drawing.
- Adding, changing and deleting constraints can all be undone.
Layers
The Layers section of the Properties tab (or Edit > Layer, Ctrl+L), and the layer folders in the Objects tab:
- + adds a layer. New objects go on the current layer: click a layer to make it current.
- The eye shows or hides a layer; the lock stops its objects from being selected or changed. Objects on every unlocked layer can be selected.
- Up / Down arrows move a layer in front of or behind others; double-click to rename it. Click the colour dot to change the layer's colour.
- To move objects to another layer, select them and change Layer in Properties.
- Layers are kept in DXF, SVG (as Inkscape layers) and PDF (as layers you can switch on and off in a PDF viewer).
Libraries and blocks
The Library section of the Properties tab shows ready-made blocks with thumbnails: furniture, appliances, building core (doors, stairs and more), garden accessories and plan spaces. Pick a library from the list, then drag a block onto the drawing. Blocks are single objects; Ungroup one to edit its parts.
Every .aff file in the program's Library folder appears as a library, so you can make your own: draw the blocks, group each one, name it in Properties and save the file into that folder.
Snapping, zoom and pan
- The status bar toggles: Snap (on/off), Grid (dot grid and snap to grid), End (end points), Mid (mid points), Center, Intersect and Near (nearest point on an object).
- Zoom with the mouse wheel or the View tab (Zoom in, Zoom out, Zoom to fit, Actual size).
- Pan with the Pan tool on the rail, Space+drag from any tool, the middle mouse button, the scroll bars, the arrow keys (with nothing selected), Shift+wheel (left and right) or Ctrl+wheel (up and down).
- For exact coordinates and lengths, type them in the command line.
The command line
View > Command Line opens a bar at the bottom where you type commands. Points are written <x,y>. Angles are in degrees, and a positive angle turns anticlockwise. The answer to a command shows in the input box until you type again; type help for the list of commands, or help rotate for an example.
Drawing:
line <0,0> <150,150> <500,0>
rect <0,0> <500,500>
circle <0,0> 500
arc <0,0> <500,0> 90
arc <0,0> <500,0> <300,200>
spline <0,0> <150,300> <500,0>
The first arc turns 90 degrees anticlockwise around <0,0>, starting at <500,0>. The second goes from <0,0> to <500,0> through <300,200>.
Editing the selected objects:
| Command | What it does |
|---|---|
move <200,300> | move by a vector |
moveto <200,300> | move the selection's centre to a point |
rotate 30 | rotate 30 degrees anticlockwise around the selection's centre |
rotate <0,0> 30 | rotate 30 degrees anticlockwise around <0,0> |
scale 2 | scale by 2 |
scale <0,0> 2 | scale by 2 around <0,0> |
scale <0,0> 2 1 | stretch to twice the width only (1 = X only, 2 = Y only) |
scale2 1.5 | scale by 1.5 around the selection's centre |
offset 50 | a parallel copy 50 units away |
movenode <200,300> 1 | move the first node by a vector |
breakcurve 100 150 | break the selected curve between two distances along it |
polarcopy <0,0> 45 4 1 0 | 4 copies around <0,0>, 45 degrees apart |
arraycopy 3 200 4 400 1 0 | 3 rows 200 apart and 4 columns 400 apart |
Each typed edit is one Undo step. Up and Down bring back earlier commands; Esc cancels.

Import and export
| Format | Import | Export (Save As) | Notes |
|---|---|---|---|
| AndyCAD .aff | yes | yes | the native format |
| DXF | yes | yes (AutoCAD R2000) | lines, polylines, arcs, circles, splines, text, blocks, layers |
| SVG | yes | yes | paths, circles, arcs, curves, fills, text, line ends; layers as Inkscape layers |
| no | yes | the shown page at its size and scale (or A4), fills with transparency, layers, CMYK colours | |
| PNG, JPEG | no | yes | a picture of the page at its size (social media pages at their exact pixels), or of the whole drawing |
| BMP | yes | no | inserts the picture |
Hidden objects are left out of every export. SVG files written by AndyCAD come back in exactly the same place when imported again.
AndyAI
AndyAI is the assistant built into AndyCAD. Open it from View > AndyAI: a chat panel opens on the right.
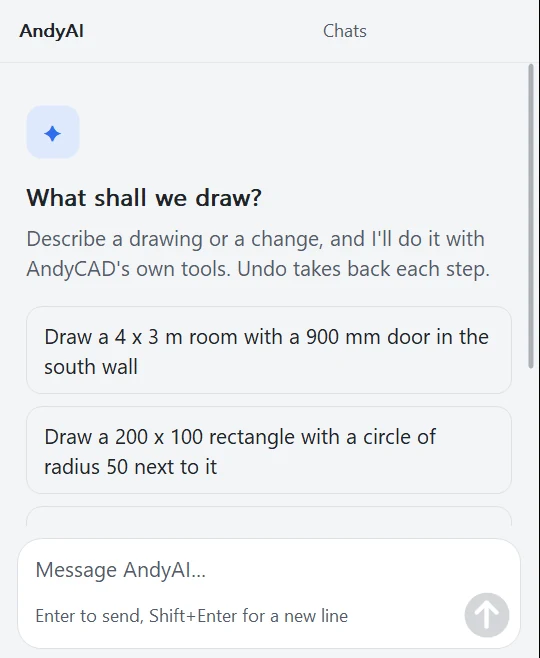
- Describe what you want in plain words, for example "draw a 4 by 3 m room with a door on the left wall", "add dimensions to the rectangle" or "put all the text on a new layer called Notes". Press Enter to send, Shift+Enter for a new line.
- The first time, the panel offers suggestions to click. You can start a fresh conversation from the top of the panel, and the send button turns into Stop while AndyAI works.
- AndyAI uses the same tools as you: it draws, selects, changes colours and properties, manages layers, places library blocks, adds text and dimensions, and looks at a picture of the drawing to check its work. Everything it draws stays fully editable, and Ctrl+Z undoes it.
- Right-click a message to copy it.
- Sign in once with your AndyCAD account (the panel asks). AndyAI comes with a monthly allowance that starts again on the 1st of each month; you can see what you have used and top it up on your account page. See pricing for the plans.
- AndyAI needs an internet connection; the rest of AndyCAD works offline.
Connecting other AI tools (MCP)
View > Allow AI Connection (MCP) lets an AI app on your computer that supports MCP (such as Claude Desktop or Claude Code) drive AndyCAD. AndyCAD then listens at http://127.0.0.1:8765/mcp, on your own computer only. Untick the menu item to stop it.
Keyboard shortcuts
| Keys | Action |
|---|---|
| Ctrl+K | search commands |
| Ctrl+N / Ctrl+O / Ctrl+S | new, open, save |
| Ctrl+P | |
| Ctrl+Z / Ctrl+Y | undo, redo |
| Ctrl+X / Ctrl+C / Ctrl+V | cut, copy, paste |
| Ctrl+A | select all |
| Ctrl+L | layers |
| Delete | delete the selection |
| Esc | finish or cancel the current tool, or cancel a text edit |
| Arrow keys | nudge the selection, or pan when nothing is selected |
| Space+drag | pan from any tool |
| Mouse wheel | zoom; Shift+wheel and Ctrl+wheel pan |
Shortcuts don't fire while you type in a box (Properties values, names, the command line or search), so typing a capital letter or pressing Delete there only edits the text.
Need help?
Email [email protected].